Healing and care
Lip Blush Healing: Color Changes Week by Week
Lip color can look too bright, peel, and then seem too light before it settles. Knowing that sequence prevents premature judgments and unsafe picking.
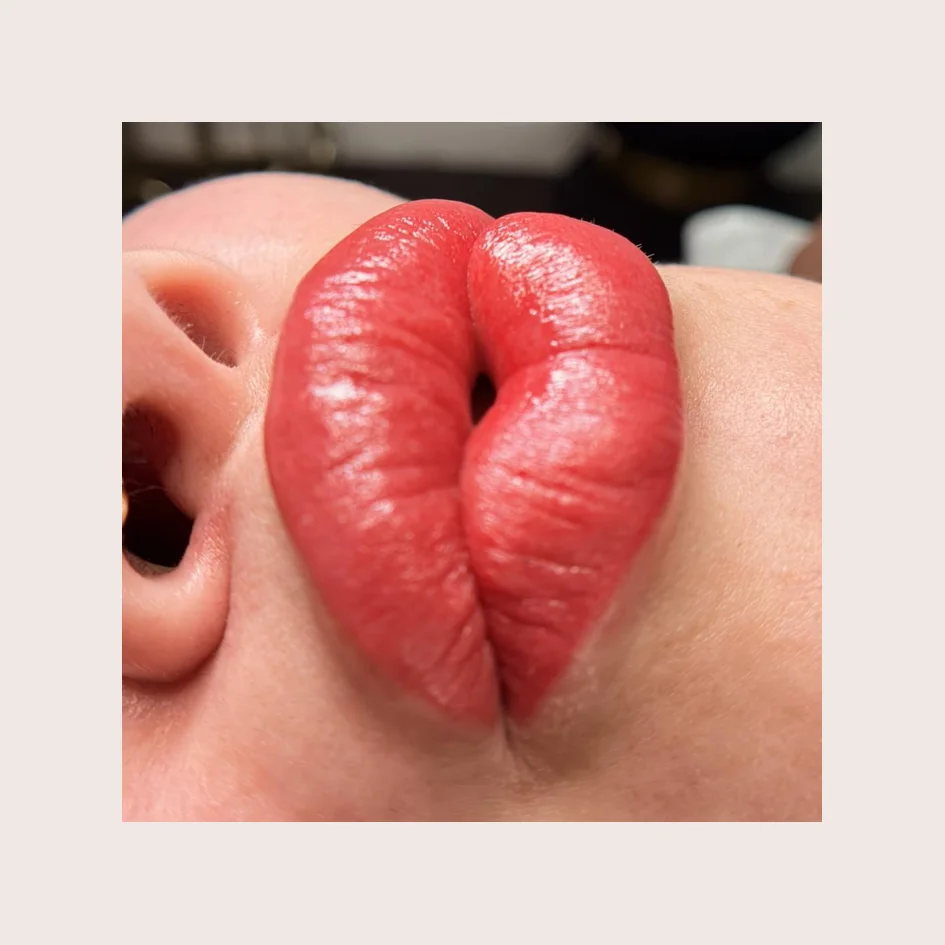
Lip Blush has one of the most dramatic visible healing cycles in permanent makeup. The color is brighter immediately after treatment, the lips can swell, the surface peels, and the tint may look extremely light before it returns and settles. None of those snapshots alone is the final result.
This guide helps you plan. It does not replace the written instructions from your artist or advice from a healthcare professional.
First, understand what Lip Blush can and cannot do
Lip Blush places cosmetic tattoo pigment to enhance the visible color and definition of the existing lips. It does not add physical volume. Cleveland Clinic distinguishes Lip Blush from fillers: tattooing can create an impression of definition or fullness through color, while filler changes volume.
The shape plan should stay with the visible lip anatomy. Temporary swelling after treatment can make lips look larger, but that is not the healed shape and should never be used as a promised result.
Fresh pigment is also much stronger than the intended tint. Choose color based on the healed target discussed in consultation, not on how bold you want the first-day photo to appear.
Before the appointment: disclose history that matters
Tell the studio about previous lip tattooing, filler, reactions, allergies, scarring, current irritation, and relevant health history. If you have experienced cold sores, disclose that before booking. Cleveland Clinic specifically recommends telling the technician about a cold-sore history.
Ask your healthcare provider whether medical planning is appropriate for you. The studio cannot prescribe antiviral medication, tell you to stop a prescription, or guarantee that an outbreak will not occur.
Do not schedule the procedure immediately before travel, a major event, dental work, or a photo session. Leave room for swelling, dryness, and visible peeling even when healing is uncomplicated.
Days 1 to 3: brightness and temporary swelling
The lips commonly look brighter than the selected target. Tenderness and swelling can occur. Follow the hygiene and product instructions supplied at the appointment; do not improvise with exfoliants, cosmetics, or home remedies.
Avoid touching the area unnecessarily. If you need to apply an instructed product, use the method and clean materials specified by the artist. Keep the surface clean and do not share lip products.
Mild tenderness should not be used to dismiss worsening symptoms. Pain, heat, redness, or swelling that increases rather than improves deserves attention. Trouble breathing, chest tightness, dizziness, intense swelling, hives, or serious pain require urgent medical care.
Days 3 to 7: peeling is not permission to pick
Dryness and peeling can make the color look uneven. A loose edge may appear ready to come off, but pulling it can damage the recovering surface and affect retention. Let it release on its own.
Do not scrub to make the lips look smoother. Follow the specific eating, drinking, cleansing, and product guidance supplied by the studio. General online instructions may conflict because products and protocols differ.
The studio aftercare page covers shared care principles. Use it as a reference, but keep the procedure-specific document from your appointment available during this stage.
Weeks 2 to 4: color may look absent before settling
Once peeling ends, clients are often surprised by how light the lips look. The surface can appear healed while the tint is still developing. Cleveland Clinic notes that it may take up to four weeks to see the final result.
Do not judge a gap or color choice during the pale stage. Take photographs in similar natural light once a week rather than checking under different bathroom lights several times a day. Consistent photos make change easier to see.
Use the artist’s stated review period rather than choosing a correction date during the pale stage. If you need a broader comparison with brow recovery, the permanent makeup healing timeline explains which visible changes are shared and which are specific to lips.
Why the healed color is not a lipstick swatch
Lip pigment is seen through the natural color and texture of the lips. A color that looks warm in a bottle, on paper, or on another person can read differently over a cool, warm, pale, or deeper natural lip tone. Existing lip tattoo pigment adds another layer. A consultation should discuss the starting tone and a realistic color family, not promise an exact match to a lipstick name.
Lighting also changes the record. Bathroom bulbs, direct sun, phone processing, gloss, and white balance can make the same lips look like different colors. Photograph the lips without a beauty filter, in indirect daylight, from the same distance. Those images are useful for observing change; they are not a substitute for an in-person assessment.
Color concerns are different from health symptoms. The American Academy of Dermatology advises medical evaluation for spreading or darkening redness, worsening pain, pus, open sores, fever, or chills. Trouble breathing, chest tightness, dizziness, intense swelling, severe pain, flushing, or hives require immediate care. The artist can identify products used, but a healthcare professional must assess a reaction.
Evaluate the healed result in the right order
After the initial healing period, assess four separate things:
- Color: Is the tint close to the healed target, understanding that long-term fading continues?
- Coverage: Are there areas with visibly different retention?
- Border: Does the definition remain within the agreed visible lip shape?
- Comfort: Has the tissue returned to its normal condition without concerning symptoms?
A healed review can separate a color concern from an area of different retention. It still cannot turn Lip Blush into filler or guarantee a specific lifespan. Our longevity guide explains why sun, smoking, skincare, color, and individual healing alter maintenance.
Bring a lip-specific plan to the consultation
Arrive ready to discuss your natural lip tone without lipstick, previous lip tattooing or filler, history of cold sores, products that irritate the lips, and the color family you use on an ordinary day. Ask where the proposed border will sit on your visible anatomy and what part of the result is color correction versus simple enhancement.
Review healed examples with a similar starting tone when they are available, not only glossy photographs taken immediately after treatment. You can book a consultation when your natural tone, previous pigment, cold-sore history, or expected result needs a private conversation.
A useful Lip Blush plan can explain three colors: the natural starting tone, the intentionally bright fresh stage, and the softer target after healing. If only the middle one is being shown, you do not yet have the full picture.
Sources consulted
Links reviewed for this edition. Medical and regulatory sources take precedence over general studio explanations.
Keep researching
Healing and care
How Long Does Permanent Makeup Last?
Permanent makeup fades, but it has no universal expiration date. Technique, skin, sun, skincare, color, and previous work all change the timeline.
Healing and care
Permanent Makeup Healing: A Realistic Timeline
Fresh pigment is not the final result. This guide explains the visible stages, what varies by service, and when a symptom needs medical attention.
PMU education
How to Choose a PMU Course in Georgia
A participation certificate is not permission to practice. Start with Georgia's requirements, then compare what you will actually learn, practice, receive, and pay.